
How to Quilt Skinny Borders & Sashings :: Quilt Your Own Adventure, Week 2
Skinny borders almost never need a whole lot of attention, but they can add a lot to the look of a quilt by quietly separating sections. That's why, even for skinny borders, it's important to make a quilting plan.
PS This post is part of Quilt Your Own Adventure, where I am quilting my Camp Oda May Moda Bakeshop QAL quilt to inspire you with a variety of quilting ideas for common traditional blocks. Be sure to check out the original post to see the full lineup of content here.
(This post contains affiliate links)

When writing an essay or story, the transitional phrases and sentences are absolutely critical for the writing to flow well. Similarly, sashing and borders are the transitional units of quilting. They help the eye move across the quilt and create the final touch of unity and motion. These motifs are drawn with sashing a borders of less than 2.5" in mind. More space gives more room to play, but when space is limited, simple elegance is ideal.
Video
Quilting Plans
Practice your quilting on paper before you ever put a needle to your beautiful quilt top. By drawing your plan in advance, you can stitch with confidence! I've arranged the plans by "level," so you can choose ideas that best fit your skill and comfort. When I draw a quilting plan, I'm deciding what parts of the quilt I want to emphasize and how I want to show off the piecing of the quilt. These plans are meant to inspire you-- feel free to use them, mix them up, or design your own plans using some of the ideas you see here!
To read more about How to Make a Quilting Plan, check out this post.
By the way, I looooove lots of quilting! I use 100% cotton Aurifil thread and either cotton or wool batting by Hobbs. All natural fibers stay soft and drapey, even with heavy quilting. If you prefer less dense quilting, you can enlarge, omit, or adapt motifs as you prefer. And don't forget to make use of the weekly live videos during this series to ask any questions you may have about adapting designs.
Intro
The Intro level quilting plans uses the four most basic FMQ motifs: meanders, loopy meanders, swirls, and switchbacks. If you are totally new to free motion quilting or if you aren't sure how to grow and develop your skills, I'd love to share my Top Three Tips for Successful Free Motion Quilting! Click here, and I’ll pop it straight over to your inbox!

Make the loops of a loopy meander all go the same way for this easy telephone cord motif, use your walking foot to quilt straight lines (don't forget to use a Hera Marker to mark them), or make small switchbacks to add more texture in a small space.

Moderate
The Moderate level uses the 10 motifs from the first two modules of FMQ Academy, plus walking foot lines. If you have been dabbling in FMQ for a little while and need an exciting push to take your skills to the next level, this is it!

Ribbon candy and pebbles are both traditional designs whereas a simplified square spiral is very modern. I usually prefer to alternate the direction in which I stitch my pebbles, but Karen Miller from Red Bird Quilt Co. likes to do her "strings of pearls" all in one direction. She has a great little tutorial at the end of this Moda Bake Shop Post.

Rockstar
In the Rockstar level, all bets are off-- I'm pulling all kinds of tricks out of my hat, so this level is designed for a confident, more experienced free motion quilter.

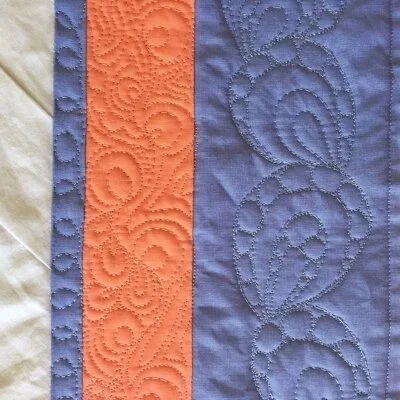
Feathers are classic, but wishbones are definitely my go-to for skinny sashings and borders. They're easy to quilt vertically and horizontally, and easy to pause and resume as I move around a quilt. To learn more about quilting efficiently like this, check out my video and blog about it here.
Remember, draw your quilting plan several times of paper before you get started, then quilt one section, one motif at a time. Even the largest quilts get quilted a piece at a time.
Share your quilting progress in the Quilting Rockstars Facebook Group!

PS Don't forget to pin this post so you can find it later!
#quiltyourownadventure
Share this blog if you found it helpful: